Quilting dates back to Ancient Egypt and it seems this charming hobby will never go out of style. Whether it’s a gift for a friend or a family heirloom, quilts are a beautiful and functional way to show you care.
But knowing where to start and how to quilt is overwhelming to begin with.
To make it easier for you, here is how to make a quilt for beginners.
The Tools
- Rotary cutter or sewing scissors
- Cutting Mat
- Quilting ruler
- Thread
- Fabric
- Sewing machine and an iron
- Batting
How to Make a Quilt
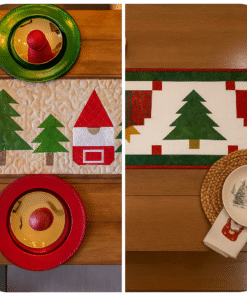
Step 1: Choose a Pattern
Patchwork squares are the best choice for beginners. You can find many free patterns online or in a patterns book at your local sewing shop.
Step 2: Choosing Materials
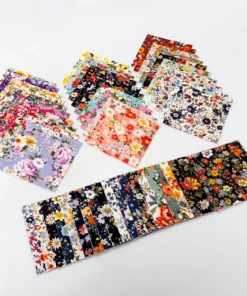
Quilt Fabric
Here comes the fun bit!
Double-check your tutorial to know how much quilt fabric, batting, backing fabric and binding fabric you need. If you’re doing a simple block like a patchwork square, decide on the dimensions of each block until you reach the quilt’s full size.
If your material is of lower quality, consider pre-washing it. Doing this will shrink it and rinse out any extra dyes which could ruin the finished product. Then iron out the fabric to remove wrinkles.
Batting
Batting is the fluffy material inside the quilt and it affects the look, feel and warmth of your quilt. You can get three types of batting: cotton, polyester and wool.
Wool and polyester are heavier and they’re great for the colder months. Cotton is breathable and lasts longer so this is better for everyday use.
Backing Fabric
Your backing fabric should be larger than the front of your quilt and the batting.
Step 3: Make Measurements
You must measure the size of each individual piece of your quilt.
Leave a ¼-inch seam allowance on either side. If you wanted each square to be 4¼ inches, measure and cut each square to be 4 x 4¼ inches.
Step 4: Cut the Pieces
Lay your front quilt material on the cutting board. Place your rule over it and use the rotary blade to follow along the cutting board’s lines.
To save time, cut a strip of fabric four inches long and cut them into four squares. Aim to get four squares out of a piece of fabric so you can use them in a block.
This is how to make a quilt square.
Step 5: Lay out Your Pattern
Iron the blocks so they’re flat and lay them out to see how the pattern will turn out.
Once decided, stack the blocks to create a row and number the rows so you know the order. Pin the blocks together so it doesn’t get confusing.
Step 6: Sew the Rows
Not sure how to sew a quilt?
Start by sewing each individual row of pieces together. Place two squares with the pattern facing each other and use a straight stitch on your sewing machine to keep to the ¼-inch seam.
Once finished, add the next square in the row to the one before it. Keep working across each row until they’re all sewn together in a long strip.
To make sure the quilt looks flat and finished, press the seams flat with your iron.
Step 7: Sew the Rows Together
Layer the first row right side up. Then, lay the second row on top, right side down. Line everything as straight as possible and pin them together. Then sew along the bottom using a ¼-inch seam.
To prevent a crooked stitch, secure the top layer into the machine and pile the rest into your lap. If you feel any tugging, stop sewing and adjust the fabric.
Then, flip the quilt cover over so the backside is facing you and iron each row for the entire back of the quilt. Repeat until your front quilt is complete!
Step 8: Lay out Your Quilt Sandwich
Iron your backing to remove any bumps. Lay your batting on top to ensure it’s smooth and even on your backing. Then, on top of this, lay down your front quilt and smooth it out.
Step 9: Baste
Basting is where you layer your quilt and pin it into place before sewing. You can either use safety pins to hold the pieces in place or use a spray-on basting adhesive.
Step 10: Sew the Layers Together
Start at the center of the quilt and sew outwards to keep bunching towards the edge of the quilt.
In this stage, you’ll sew over the seam lines (also known as ‘stitching in the ditch’) to create a nice puffy grid. It’s better to sew through more seams as it will stop the batting from moving around or scrunching.
You’ll start by sewing the quilt the right side up and on the right-hand side. You can sew straight down the first seam and then sew the edge of the quilt. Do this again for the next couple of rows.
Then turn the quilt so you’re sewing down the short side.
Step 11: Cut and Press the Binding
Binding frames the fabric to protect the quilt and keeps it neat. Cut the strips to be 2½ inches wide and long so it goes around the perimeter of your quilt.
Next, take two strips and lay them down. Take your ruler and draw a diagonal line and cut away the excess fabric. Then sew the strips together until you have enough for a border.
Once finished, fold the binding lengthwise and iron the fabric. This will create a pressed seam running down the middle of the binding.
Step 12: Pinning and Sewing the Binding
Set the binding down so the edges line up. The patterns should be face to face and the back of the binding should face you. Make sure you secure the fabric with plenty of pins.
Go along the edge of the quilt and stitch in the binding using a ½-inch seam on both sides. There should be two pieces of backwards binding sewn in place. Once finished, fold the fabric outwards and away from the quilt’s center.
Step 13: Finish the Binding
You’ve almost learned how to make quilts!
Flip the quilt over and you’ll find the edges of the binding are sticking up. Begin by folding the edge of the binding to meet the edge of the quilt all the way around. Iron the binding down and add pins to secure it.
Step 14: Your Quilt Is Finished!
Congrats, you’ve learned how to make a quilt! Now it’s time to gift it or throw it over your bed, enjoy!
Whether you’re learning how to quilt or a quilt expert, check us out for a variety of quilt products.